Learn Extending Posts Query in WP, Join Custom Tables and add new fields to Post Items In this advanced WordPress Development tutorial. I'll explain how to include data from Custom Tables into the MySQL query of WP Posts. For a practical example, We'll try adding post views counter from a custom-made database table for visits to the WP default Posts Query.
Read this WordPress tutorial for experienced developers if you want to learn how to join data from a table that does not exist in the WP default database with posts query.
It’s a long article with four chapters covering all information about the Posts Query topic.
🎯Tutorial Roadmap: Head Straight to the Point!
Here is the table of content; select a topic to begin with, while you can keep scrolling for the beginner’s starting point.
- 🥇Chapter 1: WP Way of Handling Post Storage in Database
- 🥈Chapter 2: Extend and Modify Posts Query in WordPress
- 🥉Chapter 3: Build a Post View Counter by Extending Posts Query
- 🏅Chapter 4: Tips for Extending WordPress Posts Query
- 🏆Final Chapter: Resources to Learn about the Posts Query
🥇Chapter 1: How does WordPress Store the Data for each Post in the Database?
Despite the fact that you can create your own tables, The WP development team planned a database table structure to store data for all the possible scenarios.
As you can witness on the database, WordPress has a posts table that contains essential information about each post.
As well as a postmeta table to store extra related information.
Part 1: WordPress table structure for post entity and post meta data
WordPress has a main table to store post entities and another to store the related metadata.
posts table (wp_posts with default prefix) is the main table of post entities in the WordPress database.
postmeta table (wp_postmeta with default prefix) is the storage for the metadata related to posts.
What can’t store in the posts table, will store in postmeta table.
By “can’t be stored in the posts table” I meant we do not have columns for it on the post table.
Table #1: posts table in the WordPress database
This screenshot shows columns in the posts table, however, you can check it from your database manager:
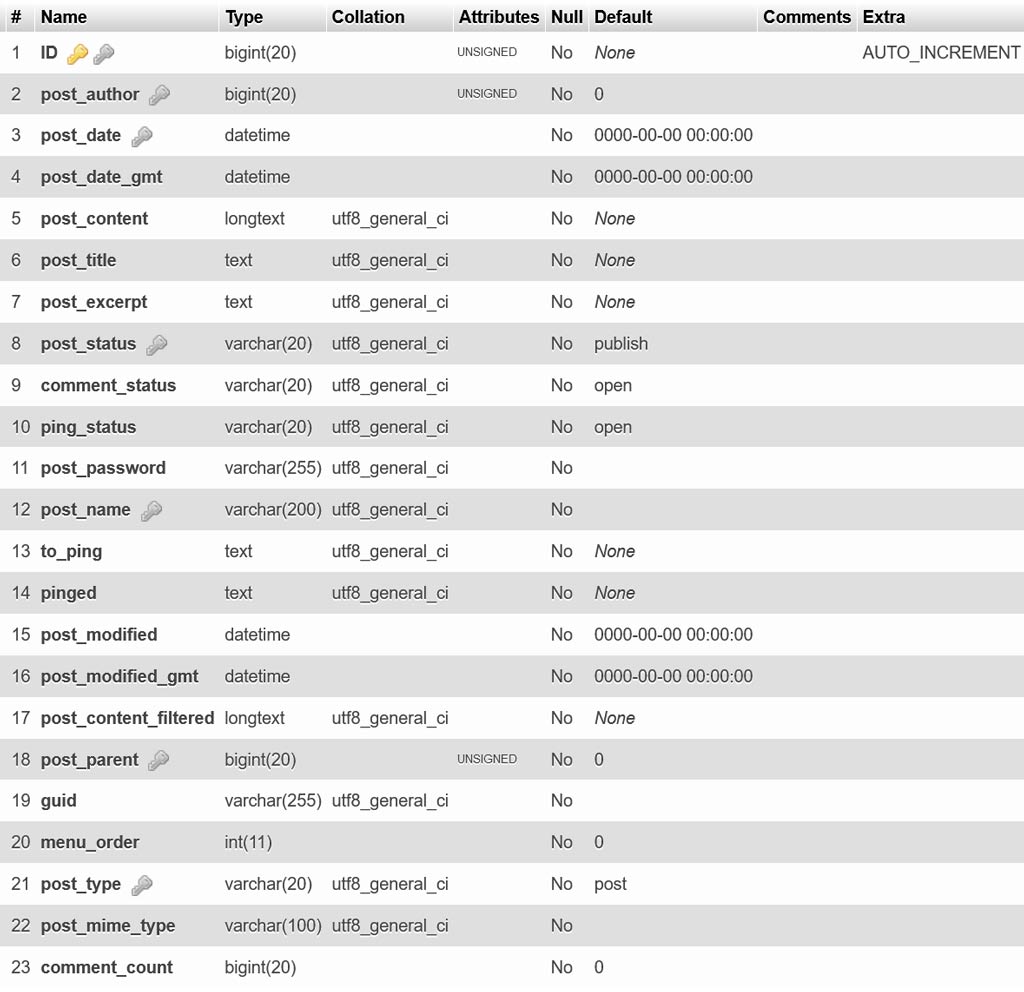
posts table structure in WordPressTable #2: postmeta table in the WordPress database
WordPress stores Non-essential information for each post in postmeta table.
Therefore, information other than title, content, date, etc., goes into postmeta table.
For example, all custom field data for each post are in postmeta table of your WordPress database.
postmeta table in WordPress has four columns that you can see in below screenshot:
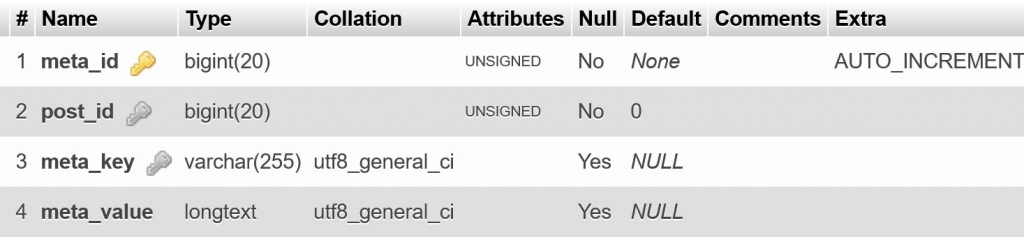
postmeta table structure in WordPressPart 2: What if we have a custom table to join with the default WP Posts Query?
Sometimes, a developer may need to include custom tables in the default WordPress database structure.
For example, when the data existed before installing WordPress.
Similarly, when the table is extracted from another database and cannot integrate into WordPress’s default database structure.
Of course, we have a solution to include information from the custom table in our posts query for each post.
How to modify Posts Query in WordPress to include information from a custom table?
WordPress lets developers modify the actual MySQL query that will execute for posts.
Therefore, a few hooks are available for modifying each part of the posts query:
I listed post_join as the last, because we must use other filters to see a meaningful result when joining a custom table to the query.
Likewise, our examples in this tutorial are in the same order to understand them better.
If you are working on a caching plugin, read Tip #7 in the Chapter 4 of this tutorial for list of hooks available to use by caching plugins.
The below SQL Query is the final query that executes to fetch posts in WordPress, so look at it before continuing:
SELECT $found_rows $distinct $fields FROM {$wpdb->posts} $join WHERE 1=1 $where $groupby $orderby $limitsSource: wp-includes/class-wp-query.php
Did you notice these variables inside the query string?
$found_rows, $distinct, $fields, $join, $where, $groupby, $orderby, $limits
We have hooks in WordPress to use when we want to extend or modify each one.
Despite that, $found_rows can NOT be modified.
🥈Chapter 2: Extend Posts Query in WordPress by Modifying All 7 Parts of the Query!
First, look at the default executed MySQL query before modifying it:
SELECT SQL_CALC_FOUND_ROWS wp_posts.ID FROM wp_posts WHERE 1=1 AND wp_posts.post_type = 'post' AND (wp_posts.post_status = 'publish') ORDER BY wp_posts.post_date DESC LIMIT 0, 10;Part 1: Modify DISTINCT in Posts Query
DISTINCT is the keyword in MySQL queries responsible for filtering duplicated rows. thus, when we use DISTINCT in our queries, results will only contain unique values.
posts_distinct filter hook in WordPress will enable us to modify the DISTINCT part of the wp posts query, In case of need for enabling DISTINCT.
Example: Enabling DISTINCT in posts query using posts_distinct filter hook
The default posts query has no DISTINCT in it, But you can add it if you need, using the posts_distinct filter hook.
// add DISTINCT to eliminate duplicated rows
if(!function_exists('my_added_distinct_to_posts_query')) {

	add_filter( 'posts_distinct', 'my_added_distinct_to_posts_query', 10, 2 );

	function my_added_distinct_to_posts_query($distinct, $wp_query) {
		return "DISTINCT";
	}

}
Result: MySQL query after modifying DISTINCT with posts_distinct filter hook
SELECT SQL_CALC_FOUND_ROWS DISTINCT wp_posts.ID FROM wp_posts WHERE 1=1 AND wp_posts.post_type = 'post' AND (wp_posts.post_status = 'publish') ORDER BY wp_posts.post_date DESC LIMIT 0, 10;The DISTINCT keyword presents after SQL_CALC_FOUND_ROWS keyword.
Part 2: Modify SELECT in Posts Query (filter data and add extra fields)
When we need to filter the selected columns or request new fields in MySQL query, we can use posts_fields filter hook in WordPress.
Example: Requesting an additional field for posts using posts_fields filter hook
in order to try this hook, we can extend SELECT part of the query and request an extra field.
Using
$wpdb->postsis the same as typing actualpoststable name.
In this example, we’ll add a field to post items containing a text: concatenation of ID and post_title columns.
//Add another field to retrieved records
//Concatenation of two columns ID and post_title used in this example
if(!function_exists('my_selected_fields_in_posts_query')) {

	add_filter( 'posts_fields', 'my_selected_fields_in_posts_query', 10, 2 );

	function my_selected_fields_in_posts_query($fields, $wp_query) {
		global $wpdb;

		//we used concat
		return $fields
		       . ", concat({$wpdb->posts}.ID,
		                    ' has title: ',
		                    {$wpdb->posts}.post_title)
		                    as id_title_text";
	}

}
Result: MySQL query after modifying SELECT with posts_fields filter hook
SELECT SQL_CALC_FOUND_ROWS wp_posts.*, concat(wp_posts.ID, ' has title: ', wp_posts.post_title) as id_title_text FROM wp_posts WHERE 1=1 AND wp_posts.post_type = 'post' AND (wp_posts.post_status = 'publish') ORDER BY wp_posts.post_date DESC LIMIT 0, 10;Did you notice the below part in the above query?
concat(wp_posts.ID, ' has title: ', wp_posts.post_title) as id_title_text
Obviously, my_selected_fields_in_posts_query function did this modification in the posts query.
As a result, you can use id_title_text field for each post to access it.
So then, the id_title_text field for a post with ID equal to 1 and “Hello World!” as the title will be:
[id_title_text] => "1 has title: Hello World!"
Part 3: Modify WHERE in Posts Query (set conditions for query)
Using the posts_where filter gives WP developers the ability to modify Posts Query’s WHERE condition.
Example: Setting conditions for posts query using posts_where filter hook
In order to try this hook, we’re going to fetch only posts with comments.
// set WHERE conditions in this example
if(!function_exists('my_where_conditions_in_posts_query')) {

	add_filter( 'posts_where', 'my_where_conditions_in_posts_query', 10, 2 );

	function my_where_conditions_in_posts_query($where, $wp_query) {

		global $wpdb;

		//we'll get 404 error on single post
		//we want only list items to affect, disable this feature for single posts:
		if(is_single())
			return $where;

		//always start with AND because we have a default WHERE 1=1 in the query
		//try only fetching posts with comments on them:
		return $where. " AND comment_count > 0";
	}

}
The return $where. " AND comment_count > 0" is telling MySQL that we only need records with at least one comment.
Result: MySQL query after modifying WHERE with posts_where filter hook
SELECT SQL_CALC_FOUND_ROWS wp_posts.ID FROM wp_posts WHERE 1=1 AND wp_posts.post_type = 'post' AND (wp_posts.post_status = 'publish') AND wp_posts.comment_count > 0 ORDER BY wp_posts.post_date DESC LIMIT 0, 10Part 4: Modify ORDER BY in Posts Query (sorting)
posts_orderby filter hook is available to use when we want to set the sort order of WordPress post items in posts query.
Example: Setting sort order for posts query using posts_orderby filter hook
This example forces the posts query to retrieve more commented records at first positions. therefore, we set the sort order of posts query as comment_count, DESC as the order direction.
// set ORDER BY column and direction in this example
if(!function_exists('my_orderby_in_posts_query')) {

	add_filter( 'posts_orderby', 'my_orderby_in_posts_query', 10, 2 );

	function my_orderby_in_posts_query($orderby) {

		global $wpdb;

		//DESC means from high to low, use 'ASC' for reverse
		$orderDirection = 'DESC';

		//we removed default sort order and set comment_count DESC as new one
		return "{$wpdb->posts}.comment_count {$orderDirection}";
	}

}
Result: MySQL query after modifying ORDER BY with posts_orderby filter hook
SELECT SQL_CALC_FOUND_ROWS wp_posts.ID FROM wp_posts WHERE 1=1 AND wp_posts.post_type = 'post' AND (wp_posts.post_status = 'publish') ORDER BY wp_posts.comment_count DESC LIMIT 0, 10ORDER BY wp_posts.comment_count DESC string presents in the Posts Query.
Part 5: Modify GROUP BY in Posts Query
GROUP BY in Posts Query is useful when you want to join other tables with posts table to use aggregate functions.
For example, when you need to count records from another table associated with each post, you must group records by post ID.
Aggregate functions in MySQL let developers calculate something based on a group of values available in different records.
MySQL supported aggregate functions to use on table columns
| Keyword | Functionality | Example |
|---|---|---|
| AVG | Calculates Average of the Values | AVG(wp_posts.comment_count) |
| COUNT | Calculates the Number of Rows | COUNT(wp_posts.ID) |
| MAX | Finds Maximum Available Value | MAX(wp_posts.comment_count) |
| MIN | Finds Minimum Available Value | MIN(wp_posts.comment_count) |
| SUM | Calculates Summation of the Values | SUM(wp_posts.comment_count) |
To understand the WP posts_groupby filter’s functionality, we skipped aggerate functions in the following example (read part 7 for aggeration function usage example along with GROUP BY).
Example: Setting Post ID as GROUP BY using posts_groupby filter hook
//Setting {$wpdb->posts}.ID for GROUP BY in Posts Query
if(!function_exists('groupby_post_id_in_posts')) {

	add_filter( 'posts_groupby', 'groupby_post_id_in_posts', 10, 2 );

	function groupby_post_id_in_posts( $groupby, $wp_query ) {
		global $wpdb;

		return "{$wpdb->posts}.ID";
	}
}
This example does not make any difference when we did not join any other table and use aggerate functions.
To see the actual result, check out part 7 of this chapter (counting postmeta records for each post as an example).
Result: MySQL query after modifying GROUP BY with posts_groupby filter hook
SELECT SQL_CALC_FOUND_ROWS wp_posts.ID FROM wp_posts WHERE 1=1 AND wp_posts.post_type = 'post' AND (wp_posts.post_status = 'publish') GROUP BY wp_posts.ID ORDER BY wp_posts.post_date DESC LIMIT 0, 10GROUP BY wp_posts.ID string presents on Posts Query now.
Part 6: Modify LIMIT in Posts Query
Limiting the number of posts to fetch is possible when using the post_limits filter hook to modify the LIMIT part of the MySQL query.
Example: Setting fetching limit to 100 records with post_limits
In this example, we will set the fetch record limit to 100 rows.
//Set post limits to 100 rows
if(!function_exists('limit_number_of_posts_in_query')) {

	add_filter( 'post_limits', 'limit_number_of_posts_in_query', 10, 2 );

	function limit_number_of_posts_in_query( $limit, $wp_query ) {

		return 'LIMIT 0, 100';
	}
}
Result: MySQL query after modifying LIMIT with post_limits filter hook:
SELECT SQL_CALC_FOUND_ROWS wp_posts.ID FROM wp_posts WHERE 1=1 AND wp_posts.post_type = 'post' AND (wp_posts.post_status = 'publish') ORDER BY wp_posts.post_date DESC LIMIT 0, 100LIMIT 0, 100 is the string responsible for commanding MySQL to fetch only 100 rows from the posts table.
Part 7: Modify JOIN in Posts Query
This part of our tutorial is the most crucial.
If we use
JOINwithoutGROUP BY, and not requesting fields inSELECT, We’ll end up with incorrect data.
We must use LEFT JOIN, GROUP BY and also SELECT together to have a meaningful set of fields and correct data.
Example: Join postmeta table with posts table to select a postmeta_counter field for each post entity
To see the result in this example, we will try SELECT, GROUP BY, and also JOIN together.
At this point, You don’t need to create a new table. In order to postpone this matter, we’ll use existing postmeta table to join with posts for a test.
We’ll try CUSTOM tables in the “build a post view counter example” on Chapter 3 of this tutoruial.
Read Chapter 3 for a real case scenario of joining NON-WP tables with Posts Query.
When implementing the below example, as result, it gives us an additional postmeta_counter field for each post.
Using
$wpdb->postmetais the same as typing actualpostmetatable name.
Obviously, additional postmeta_counter field represents the number of available metadata for that post.
We also set postmeta_counter as the ORDER BY for our posts query to sort results based on the number of metadata available for each post.
// the actual JOIN of postmeta with posts query
if(!function_exists('join_postmeta_to_posts')) {

	add_filter('posts_join', 'join_postmeta_to_posts', 10, 2);

	function join_postmeta_to_posts($join, $wp_query) {
		global $wpdb;

		//we need LEFT JOIN, other JOINs does not work in this case
		return $join . " LEFT JOIN {$wpdb->postmeta} as postmeta
					   ON postmeta.post_id = {$wpdb->posts}.ID";
	}

}

// select data we need from postmeta by modifying SELECT
if(!function_exists('select_postmeta_count_in_posts')) {

	add_filter('posts_fields', 'select_postmeta_count_in_posts', 10, 2);

	function select_postmeta_count_in_posts($fields, $wp_query) {
		//postmeta defined at JOIN.
		return $fields . ", COUNT(postmeta.meta_id) postmeta_counter";
	}

}

// Group by ID of posts gives us details of post + additional field
// It tells MySQL that we need all data for posts as main information, not other way around.
if(!function_exists('groupby_post_id_in_posts')) {

	add_filter( 'posts_groupby', 'groupby_post_id_in_posts', 10, 2 );

	function groupby_post_id_in_posts( $groupby, $wp_query ) {
		global $wpdb;
		$comma = " ";
		if ( $groupby ) {
			$comma = ", ";
		}

		return $groupby . $comma . "{$wpdb->posts}.ID";
	}
}
Result: MySQL query that executes after using these filter hooks together:
SELECT SQL_CALC_FOUND_ROWS DISTINCT wp_posts.*, COUNT(postmeta.meta_id) postmeta_counter FROM wp_posts LEFT JOIN wp_postmeta as postmeta ON postmeta.post_id = wp_posts.ID WHERE 1=1 AND wp_posts.post_type = 'post' AND (wp_posts.post_status = 'publish') GROUP BY wp_posts.ID ORDER BY wp_posts.post_date DESC LIMIT 0, 10, COUNT(postmeta.meta_id) postmeta_counter string is for selecting postmeta_counter as an extra field for posts. (posts_field hook adds this)
Note that the LEFT JOIN wp_postmeta as postmeta ON postmeta.post_id = wp_posts.ID string is responsible for joining postmeta with posts table. (posts_join hook adds this)
Also ON postmeta.post_id = wp_posts.ID tells MySQL to join the postmeta table with posts and match records using the post_id column of postmeta table.
This means when the post_id column value in the postmeta table is equal to the ID column of posts table, postmeta entity will combine with post entity.
Undoubtedly, GROUP BY wp_posts.ID in the above query is crucial to get the data based on the post entity. (Along with LEFT JOIN)
GROUP BY wp_posts.ID adds the postmeta_counter field to the post entity, along with other post fields. (posts_groupby hook adds this)
🥉Chapter 3: Build a post view counter functionality by joining a custom post views table with Posts Query
At this point, you have enough information to go to the real case example part without guilt (copy past part!).
For a helpful example, I will add a post view counter for each post, using a custom-made table populated with fake data.
👉Step 1: Create a table with sample data for post views in the WordPress database
To begin with, you need a database table and sample data.
Hence, you must use a UI-based database management software or run direct Mysql Queries that I provided below.
🧠 regardless of the fact that the following two parts contain useful details, you can Skip them by using alternative PHP code.
Before going further, note that I assumed Database Prefix is
wp_as the default WordPress setting.So if you’ve changed your installation’s prefix, replace
wp_in all of below MySQL queries with your prefix (see names of your wp tables for a hint)
➡First, Connect to WP database using a database management software, such as phpMyAdmin or PostgreSQL.
However, you can connect to the database and run queries directly from the command line, But it requires advanced OS knowledge.
If you see table names like
abc_posts,abc_postmeta, andabc_commentsin WP database, meansabc_is your table prefix.Replace the
wp_in this tutorial with your actual WP prefix. But if you do not have a prefix, remove it from MySQL queries below.
➡ Then, Create the wp_post_views table with four columns: id, post_id, user_id, user_ip.
You can create the wp_post_views table, and also insert the sample data for it using database management software UI.
In that case, skip the following two parts. Because these MySQL commands are for creating the table and its sample data.
Part 1: Creating the wp_post_views table
In case you did not use database manager UI to create the table, run the below query to create the wp_post_views table:
CREATE TABLE IF NOT EXISTS `wp_post_views` (
	`id` INT NOT NULL AUTO_INCREMENT,
	`post_id` INT(11) NOT NULL,
	`user_id` INT(11) NULL,
	`user_ip` VARCHAR(32) NOT NULL,
	PRIMARY KEY  (`id`)
);
🔺Remember to replace wp_post_views with abc_post_views if abc_ is your table name prefix instead of wp_.
Part 2: Generate sample data in wp_post_views table
You can generate this sample data using database manager UI too. but if you want to use MySQL query, execute this:
INSERT INTO `wp_post_views`
			(`id`, `post_id`, `user_id`, `user_ip`)
			VALUES
			(NULL, '1', NULL, '184.55.55.55');
🔺Again, remember to replace wp_post_views with abc_post_views if abc_ is your table name prefix instead of wp_.
Alternatively: Use WordPress PHP functions to create the wp_post_views database and sample data in one step
Use WP functions to create the table and its sample data if you don’t want to connect with the database and run queries yourself.
You can copy this code in your plugin, functions.php of the activated theme, as well as any file that can execute WP functions.
I recommend creating a simple mu-plugin, which is short for Must Use Plugin.
First, create this file in the specified directory:
wp-content/mu-plugins/my-post-views-setup.php
Create the
mu-pluginsinsidewp-contentdirectory if not already exists!
Then, Copy/Past this code into it:
<?php

if(!function_exists('myPostViewsPluginSetup')){

	//we used init hook because mu-plugins does not support register_activation_hook().
	add_action('init', 'myPostViewsPluginSetup');

	//setup function for our plugin. this function only runs once.
	function myPostViewsPluginSetup() {

		//check if post view plugin is activated
		if(get_option('my_post_views_plugin_activated') === '1')
			return;

		global $wpdb;

		$sql = "CREATE TABLE IF NOT EXISTS `{$wpdb->prefix}post_views` (
						`id` INT NOT NULL AUTO_INCREMENT,
						`post_id` INT(11) NOT NULL,
						`user_id` INT(11) NULL,
						`user_ip` VARCHAR(32) NOT NULL,
						PRIMARY KEY  (`id`)
					);";

		require_once(ABSPATH . 'wp-admin/includes/upgrade.php');
		dbDelta($sql);

		//add a sample visit for all posts when activating
		$posts = get_posts(array('posts_per_page' => -1));
		foreach($posts as $post){
			$wpdb->insert("{$wpdb->prefix}post_views",
							array('post_id' => $post->ID,
								  'user_id' => null,
								  'user_ip' => '::')
						 );
		}

		//set activation option to 1, so we do not execute this function again.
		//if we could use register_activation_hook() in mu plugins we had no such problem.
		update_option( 'my_post_views_plugin_activated', '1');

	}

}
MU-Plugins in WordPress are enabled by default. So you do NOT need to enable it on the admin panel.
After this, I can imagine that the wp_post_views table is in the WP database with a sample visit saved for each post on your website.
🤝Step 2: Join the wp_post_views table with WordPress Posts Query
To join our wp_post_views with posts query, use the below code:
// select data we need from custom table by modifying SELECT
if(!function_exists('add_my_post_views_to_fields')) {

	add_filter('posts_fields', 'add_my_post_views_to_fields', 10, 2);

	function add_my_post_views_to_fields($fields, $wp_query) {
		return $fields . ", COUNT(post_views.id) view_counter";
	}

}

// join our custom table with posts query
if(!function_exists('join_my_post_views_to_query')) {

	add_filter('posts_join', 'join_my_post_views_to_query', 10, 2);

	function join_my_post_views_to_query($join, $wp_query) {
		global $wpdb;

		//we need LEFT JOIN, other JOINs does not work in this case
		return $join . " LEFT JOIN {$wpdb->prefix}post_views post_views
					   ON post_views.post_id = {$wpdb->posts}.ID";
	}

}

// if did not set groupby, records will be disappeared
if(!function_exists('groupby_my_post_views_in_query')) {

	add_filter('posts_groupby', 'groupby_my_post_views_in_query', 10, 2);

	function groupby_my_post_views_in_query($groupby, $wp_query) {
		global $wpdb;
		$comma = " ";
		if ($groupby)
			$comma = ", ";

		return $groupby . $comma . "{$wpdb->posts}.ID";
	}

}
After this, If you check the posts array in detail, you can find our view_counter as a new field.
👌Step 3: Try printing the post views number for each post
To print post views numbers, you can use a content modify hook to add view_counter any spot you want.
My cheatsheet when I need a filter is this file:
wp-includes/default-filters.php, But not just for posts.
For example, the_excerpt is a hook to modify post content. therefore, you can use it and add view_counter to the post excerpt.
Likewise, the_content is the modifier hook for the post’s content.
Furthermore, the_title is a clear name for the post title filter hook.
I used these three options to print the post view counter in the below example. But you better select one and remove others.
// append view_counter field after post excerpt
if(!function_exists('append_post_views_to_post_excerpt')) {

	//Note: use get_the_excerpt if get_the_title() prints the excerpt in your theme.
	add_filter('the_excerpt', 'append_post_views_to_post_excerpt', 10, 2);

	function append_post_views_to_post_excerpt($excerpt) {
		global $post;

		if($post && isset($post->view_counter))
			return "{$excerpt} (Post Views: {$post->view_counter})";

		return $excerpt;
	}

}

// append view_counter field after post content
if(!function_exists('append_post_views_to_post_content')) {

	//Note: use get_the_content if get_the_title() prints the content in your theme.
	add_filter('the_content', 'append_post_views_to_post_content', 10, 2);

	function append_post_views_to_post_content($excerpt) {
		global $post;

		if($post && isset($post->view_counter))
			return "{$excerpt} (Post Views: {$post->view_counter})";

		return $excerpt;
	}

}

// append view_counter field after post title
if(!function_exists('append_post_views_to_post_title')) {

	//Note: use get_the_title if get_the_title() prints the title in your theme.
	add_filter('the_title', 'append_post_views_to_post_title', 10, 2);

	function append_post_views_to_post_title($title) {
		global $post;

		if($post && isset($post->view_counter))
			return "{$title} (Post Views: {$post->view_counter})";

		return $title;
	}

}
First, use
get_the_excerpthook whenecho get_the_excerpt()prints the post excerpt.Second, use
get_the_contentfilter whenecho get_the_content()prints the post content.Lastly, use
get_the_titlefilter whenecho get_the_title()prints the post title.
After this, check your posts list or single post page, and you can view Post Views: x where you requested.
👍Step 4: Save actual post visits in our wp_post_views table
There are two options available when you want to save post view record on the database table after each visit.
One for the websites without cache plugins and another if the cache is enabled.
Option #1: Save visits when page caching is NOT enabled
Use this code to get the visitor’s IP address and current user’s ID (if available), then save the data to the post views table in case of a visit.
After this, a record inserts into the post views table when a visitor visits a post page.
If not, it may be a problem with page caching plugins. In such a case, use option 2 to save the visits.
Option #2: Save visits when page caching is enabled
Because cache plugins ditch filter hooks, you must create a special URL to save page visits with JavaScript AJAX requests.
You need a <script> tag in post pages, containing a JavaScript function for sending an AJAX request to save visits for the current post.
🎁Step 5: Wrap all these functionalities into a DIY Post View Counter Plugin
Even though you can use previous steps to utilize the post view counter, I’ll teach you to create a plugin out of what you’ve learned.
WP plugins are simply functional by enabling them from the admin panel, so you can employ this functionality for any website you want with a few clicks.
Part 1: Create the plugin’s folder and main PHP file
Plugins are stored in the wp-content/plugins directory inside WordPress folder structures.
To create the my-post-view-counter plugin, create this file in the specified directory:
wp-content/plugins/my-post-view-counter/my-post-view-counter.php
Part 2: Append all functions in the plugin’s main PHP file
To do this, simple Copy/Past these codes into the my-post-view-counter.php file:
<?php
/**
 * My Post Views
 *
 * @package     MyPostViwes
 * @author      Mehdi Nazari
 * @copyright   2022 Mehdi Nazari
 * @license     GPL-2.0-or-later
 *
 * @wordpress-plugin
 * Plugin Name: My Post Views
 * Plugin URI:  https://mehdinazari.com/join-custom-tables-with-wordpress-posts-query/
 * Description: This plugin saves post views on a custom table and then prints it on posts.
 * Version:     1.0.0
 * Author:      Mehdi Nazari
 * Author URI:  https://mehdinazari.com
 * Text Domain: my-post-views
 * License:     GPL v2 or later
 * License URI: http://www.gnu.org/licenses/gpl-2.0.txt
 */


if (!function_exists('myPostViewsPluginSetup')) {

	add_action('init', 'myPostViewsPluginSetup');

	register_activation_hook( __FILE__, 'myPostViewsPluginSetup' );


	//setup function for our plugin. this function only runs once.
	function myPostViewsPluginSetup() {

		global $wpdb;

		$sql = "CREATE TABLE IF NOT EXISTS `{$wpdb->prefix}post_views` (
						`id` INT NOT NULL AUTO_INCREMENT,
						`post_id` INT(11) NOT NULL,
						`user_id` INT(11) NULL,
						`user_ip` VARCHAR(32) NOT NULL,
						PRIMARY KEY  (`id`)
					);";

		require_once( ABSPATH . 'wp-admin/includes/upgrade.php' );
		dbDelta( $sql );

		//add a sample visit for all posts when activating
		$posts = get_posts( array( 'posts_per_page' => - 1 ) );
		foreach ( $posts as $post ) {
			$wpdb->insert( "{$wpdb->prefix}post_views",
				array(
					'post_id' => $post->ID,
					'user_id' => null,
					'user_ip' => '::'
				)
			);
		}

	}

}

// select data we need from custom table by modifying SELECT
if(!function_exists('add_my_post_views_to_fields')) {

	add_filter('posts_fields', 'add_my_post_views_to_fields', 10, 2);

	function add_my_post_views_to_fields($fields, $wp_query) {
		return $fields . ", COUNT(post_views.id) view_counter";
	}

}

// join our custom table with posts query
if(!function_exists('join_my_post_views_to_query')) {

	add_filter('posts_join', 'join_my_post_views_to_query', 10, 2);

	function join_my_post_views_to_query($join, $wp_query) {
		global $wpdb;

		//we need LEFT JOIN, other JOINs does not work in this case
		return $join . " LEFT JOIN {$wpdb->prefix}post_views post_views
					   ON post_views.post_id = {$wpdb->posts}.ID";
	}

}

// if did not set groupby, records will be disappeared
if(!function_exists('groupby_my_post_views_in_query')) {

	add_filter('posts_groupby', 'groupby_my_post_views_in_query', 10, 2);

	function groupby_my_post_views_in_query($groupby, $wp_query) {
		global $wpdb;
		$comma = " ";
		if ($groupby)
			$comma = ", ";

		return $groupby . $comma . "{$wpdb->posts}.ID";
	}

}

//get visitor's ip address
if(!function_exists('getVisitorIPAddress')) {
	function getVisitorIPAddress(){

		if (!empty($_SERVER['HTTP_CLIENT_IP']))
			$ip = $_SERVER['HTTP_CLIENT_IP'];
		elseif (!empty($_SERVER['HTTP_X_FORWARDED_FOR']))
			$ip = $_SERVER['HTTP_X_FORWARDED_FOR'];
		else
			$ip = $_SERVER['REMOTE_ADDR'];

		return $ip ? $ip : "::";
	}

}

//add visit record to post views table
if(!function_exists('addPostVisitsToMyPostViewsTable')) {
	function addPostVisitsToMyPostViewsTable(){

		global $wpdb;

		//define visit data array
		$visitData = array();

		//get the post ID
		$visitData['post_id'] = get_the_ID();

		//get user ID (if available)
		$userId = get_current_user_id();
		if($userId)
			$visitData['user_id'] = $userId;

		//get visitor IP
		$visitData['user_ip'] = getVisitorIPAddress();

		//insert visit, then return number of rows on success, or false if failed.
		return $wpdb->insert("{$wpdb->prefix}post_views", $visitData);
	}

}

//trigger addPostVisitsToMyPostViewsTable() in case of post visit, using the_content hook
if(!function_exists('add_visit_to_my_post_views_trigger')) {

	add_filter('the_content', 'add_visit_to_my_post_views_trigger');

	function add_visit_to_my_post_views_trigger($content){

		//check if it's a post, then save the visit
		if (is_single())
			addPostVisitsToMyPostViewsTable();

		//let WP continue without modifying post content
		return $content;
	}

}


// append view_counter field after post excerpt
if(!function_exists('append_post_views_to_post_excerpt')) {

	//Note: use get_the_excerpt if get_the_title() prints the excerpt in your theme.
	add_filter('the_excerpt', 'append_post_views_to_post_excerpt', 10, 2);

	function append_post_views_to_post_excerpt($excerpt) {
		global $post;

		if($post && isset($post->view_counter))
			return "{$excerpt} (Post Views: {$post->view_counter})";

		return $excerpt;
	}

}

// append view_counter field after post content
if(!function_exists('append_post_views_to_post_content')) {

	//Note: use get_the_content if get_the_title() prints the content in your theme.
	add_filter('the_content', 'append_post_views_to_post_content', 10, 2);

	function append_post_views_to_post_content($excerpt) {
		global $post;

		if($post && isset($post->view_counter))
			return "{$excerpt} (Post Views: {$post->view_counter})";

		return $excerpt;
	}

}

// append view_counter field after post title
if(!function_exists('append_post_views_to_post_title')) {

	//Note: use get_the_title if get_the_title() prints the title in your theme.
	add_filter('the_title', 'append_post_views_to_post_title', 10, 2);

	function append_post_views_to_post_title($title) {
		global $post;

		if($post && isset($post->view_counter))
			return "{$title} (Post Views: {$post->view_counter})";

		return $title;
	}

}
Part 3: Activate the plugin from the WP admin panel
Open your WordPress admin panel and enable your plugin from the plugins->installed plugins page.
That’s it, and now you have the post view counter functionality on your website.
Try it by visiting a post in the frontend, then check the counter to see if it works or not.
🏅Chapter 4: Tips to keep in mind when you want to join custom tables in WordPress Posts Query
Now that you have come to this point, get ready for your mastering degree in 3…2…1
Oh, please wait a minute; I guess I forgot something important. 🚨
Finally, read these seven tips to master Posts Query in WordPress. 👇
Tip #1: Backup, Backup, Backup, and again, BACKUP!
I can’t tell you how many times I got out of trouble because I had a recent backup available.
Believe me, the most necessary step when developing software is backing up files and databases.
Remember to store backup files somewhere safe. Because backups often include sensitive data, usable by hackers.
You can find the best backup management plugins when visiting the wordpress.org plugins directory.
Tip #2: Understand the difference between different types of JOIN
In SQL queries, you can use JOIN to combine multiple tables and then make a mixed result based on specified relationships.
For example, you have posts and postmeta tables in the WP database.
The postmeta table has a post_id column that binds the relationship between postmeta and the posts table.
When we want to add meta information for a post with ID equal to 1, we can create a record in the postmeta table and set post_id=1 for it.
Because of this approach, MySQL knows which postmeta belongs to which post entity in posts table.
When we want to retrieve information of a post and include data stored for that post in postmeta table, we can join the two tables and make a mixed record of their columns.
Though, we have multiple options to tell the database how to combine tables:
JOIN: Asks for records with matching values in both tables. therefore, If a match does not exist, the result is null.LEFT JOIN: Asks for records from the first table mixed with matched records from the second. therefore, If a match does not exist in the second table, information on the first table will return.RIGHT JOIN: Asks for records from the second table mixed with matched records from the second table. accordingly, If a match does not exist in the first table, information on the second table will return.- FULL JOIN: Asks for records mixed together; hence, the first or second table does not matter.
I guess LEFT JOIN is helpful in many scenarios.
However, I will not explain more about possible join options. Because you need a full-length tutorial on this topic.
A picture worth a thousand words, So look at this one:

Tip #3: Group By {$wpdb->posts}.ID is an essential part of our code when using aggeration functions along with joining tables
Obviously, Post ID is a unique key for each post.
Also, GROUP BY keyword is for grouping records based on a column.
Aggregation Functions are helpful when performing calculations on multiple records in tables.
When we want to perform an aggeration function on associated values to a post, we need to group records by Post ID.
This way, we tell the database: “We need to calculate something based on available values for each post item. Please do the calculation, then specify which value is for which post item. Thank you!”.
Tip #4: Find solutions to store your data in postmeta table instead of creating new tables
In chapter 1 of this tutorial, I told you this:
The WP development team planned a database table structure to store data for all the possible scenarios.
in case you did not encounter any performance issues, you better trust the WordPress structure.
The posts and postmeta tables can offer a solution to store different entities, NOT only Posts, but any type of data.
Consider these two tables your primary way of storing data when developing plugins or themes.
Therefore, custom post types are the solution for offering content storage to users.
Plus, WordPress preserved functionalities that developers can execute on the post items.
For example, you can create a slideshow plugin and save the slides with a custom post type.
You can also create custom taxonomies to categorize items of custom post types.
Always think twice before making new tables and messing up the WordPress database.
Tip #5: Choice a unique and understandable name for your new fields and database columns
When using the posts_filter hook to request new fields, or create new tables in the database, always use comprehensible name keys.
For one thing, separate different words in the key with underlines to increase the readability.
As an example, do NOT use postid, or postId (better choice, by the way), use post_id instead.
Another developer can read the name at first sight when using underline as the separator.
Tip #6: For testing proposes, do not execute get_posts() in the functions.php directly
At least use a hook with a suitable execution time.
When trying to execute get_posts() directly in your functions.php file, posts query modifier hooks will not affect the result.
template_redirect hook can be a good choice when you want to try if your codes work as expected or not.
This hook indeed executes after posts query modifier hooks.
add_action('template_redirect', 'my_test_function_name');
function my_test_function_name(){
    // run your codes, but it is not a cool way to test!
    print_r(get_posts());
}
Tip #7: Append _request at the end of hook names if you are building a caching plugin (ex: posts_join_request instead of posts_join)
For one thing, cache plugins will save a static version of your pages someplace on the disk.
If a user visits those cached pages, WP serves that static file containing pure HTML code instead of connecting to the database.
When you are working on building your caching plugin, you can append _request to posts query modification hooks.
Using this approach, undoubtedly, WordPress ensures that your query modifier functions are executing.
| Original Hook | Hook for Caching Plugins |
|---|---|
posts_distinct | posts_distinct_request |
posts_fields | posts_fields_request |
posts_where | posts_where_request |
posts_groupby | posts_groupby_request |
posts_orderby | posts_orderby_request |
post_limits | post_limits_request |
posts_join | posts_join_request |
Because the coding chapters of this tutorial are finished, you can travel back to chapter 1.
However, you can continue scrolling to the final chapter for the top learning resources.
🏆Final Chapter: Never Stop Learning, My Developer Friend, NEVER!
In case you missed that, I was shouting the “NEVER” in the title.
Ok, Now, It’s the final chapter.
But only if you consider this section a chapter or if learning somehow had a final chapter.
Then, I hope this is not the final chapter of learning for any of you developers; I just finished my work in this section.
Keep reading the perfect resources available to learn more about Extending WordPress Posts Query.
Continue learning by visiting the list of resources for the brilliant developers who never get satisfied by one tutorial (even if it’s a long tutorial like this one!).
⛓Part 1: Top resources to learn about WordPress Posts Query Development
Of course, I did not cover every part of this topic. Nobody can do it alone.
I tried to include everything I learned over the years in this tutorial. Although, It would be best if you continued exploring; When there is more stuff to know.
Visit places on the internet that can help you a lot more than I can:
🔗Source #1: WordPress official pages about Posts Query hooks:
WordPress’s official website has the best tutorials for developers. Then, If you are interested in being a WP developer, visit the developers section of the WordPress.org website to try out tutorials.
I recommend these pages for you to learn Posts Query development on the official WP website:
- WP_Query class page
- get_posts function page
- posts_distinct hook page
- posts_fields hook page
- posts_join hook page
- posts_where hook page
- posts_groupby hook page
- posts_orderby hook page
- post_limits hook page
🔗Source #2: StackExchange and StackOverflow questions on Posts Queries topic
Search any keyword you’ve encountered in my tutorial on StackOverflow, then you will be surprised to witness developers helping others.
Visit the wp_query search page on StackOverflow for related topics regarding querying WP posts.
The list of frequent questions tagged with wp-query on wordpress.stackexchange.com also contains many frequently asked questions you may encounter in the future.
StackOverflow is a site in the network of StackExchange that contains programming questions, while wordpress.stackexchange.com is a site about WordPress-only topics.
⛓Part 2: Where to ask questions about challenges you are facing
StackOverflow is always the best place to ask your questions about programming issues.
Don’t forget wordpress.stackexchange.com, which has a truly active community of brilliant WordPress developers, humble enough to help beginners.
WordPress’s official support team has a forum for WP developers that you can visit to ask questions about WordPress development.
⛓Part 3: My top recommended list of tutorials for interested WordPress developers
Learn more about WP development by reading seven must essential WordPress tutorials on my blog; however, I did not include any external links in the list (I’m sorry about that 😥):
- Learn how to build a plugin for WordPress
- Learn how to use action and filter hooks in WordPress
- Learn how to retrieve WordPress posts with desired filters
- Learn how to query WordPress categories, tags, and custom taxonomies
- Learn how to register custom shortcodes in WordPress
- Learn how to get comment details in WordPress
- Learn how to get the list of users in WordPress
Repeat this tutorial from chapter 1, or continue scrolling to see a list of the latest WordPress tutorials on my blog.
written by Mehdi Nazari about in WordPress WordPress Plugin Development WordPress Theme Development
What do you think about "How to Extend WordPress Posts Query and Join New Tables"?